Feather Play

Feather Play

Friday, February 9, 2018

Chain Piecing

Chain Piecing


There is a method of sewing called 
CHAIN PIECING.

Some people LOVE this method!

Some DON'T!

Some just don't KNOW HOW!

But...WHAT IS IT?

Usually as we sew we are sewing 2 pieces together.
We put RST (right sides together)
and sew the seam.
Take it out of the sewing machine 
and clip the threads.
One seam done.
Now repeat.

Chain stitching is when we sew 2 pieces together as usual,
RST, and sew the seam.
BUT,
We don't take it out and clip the threads after each little seam.
We sew one seam, 
then stitch a few extra stitches,
now we put in the next pieces,
sew that seam,
stitch a few extra stitches,
put in the next pieces,
sew that seam.
We go until all that you want to sew is sewn.
(I usually do like kind, stop, like kind, stop. 
Others can do an amazing long line of chain piecing!)
Do what works for YOU!

When you cut your thread at the end,
You'll have a LONG chain of all your pieces sewn together!


CHAIN PIECING!

It saves in time and thread!


Here's a few SIMPLE ways to Chain Piece.

One method is:
You can line everything up in a row in front of you, 
then flip them RST (right sides together) just before you sew them.

Another methode is to make a stack of each piece,
Right side up,
Then put Right sides together and you sew them.

Another way...
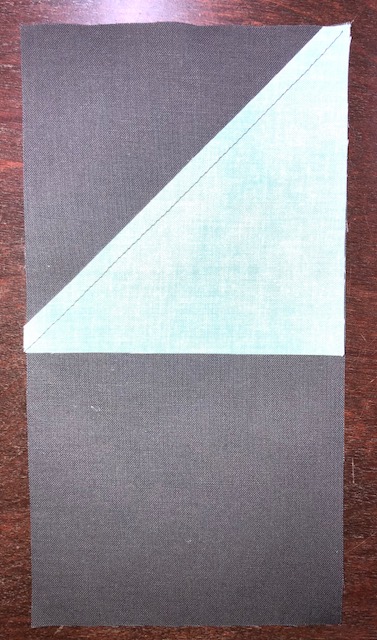
You can already place your pieces Right sides together,
Then line them up and sew.

The method you choose is up to you!

The chain piecing is the same no matter what!

NOW...
Cutting ALL these pieces apart can also be time consuming.

There is a WONDERFUL little gizmo
that has a razor blade in it 
that makes things go super fast!

There are several different kinds,
ALL do the same thing!
All are available for less than $15!


This is how it works...
Here is my chain and my thread cutter...

 Place the little thread section between your 
sewn pieces across that blade and pull down.

 That wonderful little blade will cut those
threads, and you move onto the next section.

Do this until your chain is now in individual sections.

Sometimes,
 it's easier to press while they are still in a chain,
especially small pieces.

Have fun quilting!!!


Sew the pieces of life together!
They make a BEAUTIFUL quilt!

Nina Clotfelter
www.ninaquilts.com


Thursday, February 8, 2018

Block #5 NQC Quilt Block Challenge

NQC Quilt Block Challenge

Block #5
Electra Star

This is a quilt designed by Gina Perkes
9 Blocks
1 per week
Get on Facebook and join the group!
The quilt is BEAUTIFUL!!!
GREAT JOB GINA!!!
(I DO have Gina's permission to post about the dies!)


Gina has some additional files and videos...
WELL WORTH reading and watching!

This is a fun block!
BUT...
You do have some spots to be careful in...

OUR DIES:

Since our blocks are a finished 16" block,
Again, our dies come from the 8" GO! Qube.
I used die #1, #3, #4
(Other dies available will be posted at the end of this blog.)

Let's start cutting our fabrics...

Fabric A:
8 - 4" finished QRT (Quarter Square Triangle)
Using Die #4 (55711)


4 - 4.5" Squares
Using Die #1 (55708)

Fabric B:
4 - 3.25" HST
Using die #3 (55710) (4" finished and cut it down)
OR
Use die #3 (55703) (3.5" finished) from the 6" GO! QUBE,
and you'll have less waste when you cut it down.
Then, after you've sewn the HST together,
 trim it down to 3.25" square.

OR

From the 6" GO! QUBE

Fabric C:
4 - 3.25" HST finished
(Same as above Fabric B)
Die #3 of either the 8" or 6" GO! QUBE
Then, after you've sewn the HST together,
 trim it down to 3.25" square.


OR


1 - 4.5" Square
Using die #1 (55708)


Fabric D & E:
6 EACH - 4" finished HST
Using Die #3 (55710)


Fabric F:
4 - 4" finished QST
Using Die #4 (55711)


First
We make the two colored HST using 
Fabrics B & C

Sew the HST together matching the notched edges.
Sew 1/4" seam allowance from point to point.


Press to one side.

Then,
The rest of the block is sewn together
 just as Gina has written in her directions.

I will tell you...
You have to pay attention to which side you're sewing 
the D & E pieces to!

We used a die for these HST,
So we don't have the dog ears
And the cut edges will match up.


 I was just happily going along...
 And LOOK!
Both sides are the SAME color!
I had my pile of 6 and just kept going!
 So...
The best friend we love to hate...
We had a good conversation!

And here is my finished block

And ALL my blocks together

4.5" half square triangle (HST)
4" finished:
GO! - #55031
Studio - #50270
Sizzix - #657609

4.5" square:
GO! - #55060
Studio - #50748, #50123, #50015
Sizzix - #657626

4.5" quarter square triangle (QST)
4" finished:
GO! - #55316
Studio - #50365
Sizzix - didn't find.
(Sizzix has several QST without block measurements, 
so it might be there.)

3.5" HST
GO! - #55009
Studio - #50800
Sizzix - #657610


(All dies are straight from the brand website)


Keep those blocks coming!
You're each doing an AMAZING job!!!


Sew the pieces of life together!
They make a BEAUTIFUL quilt!

Nina Clotfelter
www.ninaquilts.com


Thursday, February 1, 2018

Block #4 NQC Quilt Block Challenge

NQC Quilt Block Challenge

Block #4
Atlas Star

This is a quilt designed by Gina Perkes
9 Blocks
1 per week
Get on Facebook and join the group!
The quilt is BEAUTIFUL!!!
GREAT JOB GINA!!!
(I DO have Gina's permission to post about the dies!)


Gina has some additional files and videos...
WELL WORTH reading and watching!


This block is similar to the other star blocks...
You CAN DO THIS!
We have some fun little detail in the corners of this new block.

Since our blocks are a finished 16" block,
Again, our dies come from the 8" GO! Qube.
I used die #1,#2,  #3, #5, #8
(Other dies available will be posted at the end of this blog.)

Let's start cutting our fabrics...

Fabric A:
4.5" x 8.5" - still had to hand cut these...
2.5" squares - Die #2 (#55709) 2' sq. finished
Strip - 3 1/8 x 15" - Die #5 (#55712) 2" finished HST

 (Has fabric E so you could see it...LOL) 

(Has fabric C so you could see it...)


Fabric B:
4.5" squares - Die #3 (#55710) 4" finished HST


Fabric C:
3 1/8 x 15" - Die #5 (#55712) 2" finished HST


Fabric D:
2.5" squares - Die #5 (#55712) 2" HST finished


Fabric E:
2.5" x 4.5" rectangle - Die #8 (#55715) 2.5" x 4.5" rectangle


Fabric F:
4.5" square - Die #1 (#55708) 4.5" square
You can fussy cut this and have a great center to your block!


On Gina's directions she has some squares that we've just cut as HST.
This is because they are used as HST,
not as squares,
in the block.
(PLEASE...you are always able to cut the squares and
do construction EXACTLY as Gina does!
Our DIES just cut very accurate and
save us SO much time!)

To follow Gina's method using squares,
Use dies #1 - 4.5" sq.
and #2 - 2.5" sq.
Then follow Gina's directions using these squares to make HST.

So,
Let's lay it out to make sure it's all good.

The few differences 
using the HST dies are:

We cut 2" HST finished...
So we sew the HST triangles together
using fabric A & C.

Here they are laid out as the finished square. 

Now,
Place them right sides together

Sew from point to point.

Press to the fabric C side, 
as the directions say.


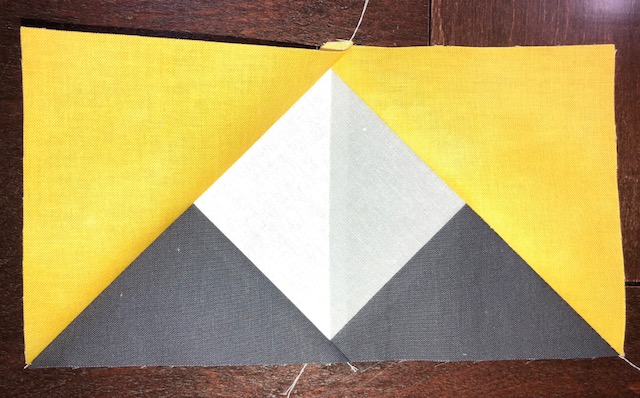
Flying Geese
are a little different using the dies.
Using Fabrics D & E...
We've cut the HST.
Here it is laid out...
(I just like to do this to make sure to get it right.)


Take one HST and flip it so it's right sides together.
Make sure you line up the corner
(as shown top right in the picture below),
Then the long edge lines up,
and the bottom edges will line up as well.

Sew from corner to corner

Now press the HST toward the corner
as the directions say.

Let's add the other side HST
Again,
Silly me...
I've laid it out...just to make sure...

Now,
flip it so they're right sides together

And stitch from corner to corner.
No trimming!

Press as the directions say...
Toward the corner.
FLYING GEESE!

LET'S DO IT AGAIN!!!
Fabrics A & B
Lay it out to get it in your head. 

 Place one HST
Right sides together.
Match the corner and the long side,
then the other corner should be right.

 Sew from corner to corner.
No trimming!

  Press towards corner.

Repeat on the other side...
It's laid on there...

Flip it so it's right sides together
Matching the corner and long side.
Sew from corner to corner.

Press toward corner.
You have your FLYING GEESE!
GREAT JOB!

The rest is just as the directions are written.

When you're chain stitching,
There are simple ways to keep you straight and organized.

You can lay them out in front of you.

And stitch.

Or make a pile of each piece
and have them so it's easy to place RST
and keep on sewing.

Continue following Gina's directions 
and all the pieces will get together


AND...
You have a FINISHED block! 


Here's all 4 of my blocks created so far...

4.5" x 8.5" rectangle:
GO! - #55160
Studio - didn't find
Sizzix - #658113

4.5" half square triangle (HST)
4" finished:
GO! - #55031
Studio - #50270
Sizzix - #657609

4.5" square:
GO! - #55060
Studio - #50748, #50123, #50015
Sizzix - #657626

2.5" Square
2" finished:
GO! - 2.5" square - #55059, #55018(came with GO!)
Studio - 2.5" square - #50124, #50204, #50603
Sizzix - 2.5" square - none - use 2.5" strip die #659159
(or cut by hand)

2.5" HST
2" finished:
GO! - #55063, #55018
Studio - #50161, #50272
Sizzix - #659165


(All dies are straight from the brand website)


Keep those blocks coming!
You're each doing an AMAZING job!!!


Sew the pieces of life together!
They make a BEAUTIFUL quilt!

Nina Clotfelter
www.ninaquilts.com